TABLE OF CONTENTS
- Overview to Scenes in Casambi Pro
- Creating a scene
- Values in the Scenes table
- Scene properties
- Scene table in Casambi Pro for iOS
- Deleting a scene
- Dimming control in a scene
- Daylight control in Casambi Pro for Windows
- Daylight control in Casambi Pro for iOS
- Circadian profiles in scenes
- Notes about scenes
Overview to Scenes in Casambi Pro
in Casambi Pro, scenes are created separately for each space. The Scenes table lists scenes in the selected space as columns and all luminaire groups in the space as rows.
Scene principles in Casambi Pro:
- A scene is always part of one space.
- Scene’s functional scope is its own parent space. Therefore, only the luminaire groups in the parent space can be included a scene.
- Scenes are triggered by controllers (sensors, switches and schedules).
- By default, every scene controls the dimming level of each luminaire group in the parent space. User can use the scene properties to add other lighting parameters to the scene (e.g. colour temperature)
- By default, every luminaire group is included in the scene, following scene’s default values. The default values can be overridden by setting group specific local values in the scene properties when a group cell in the scene table is selected.
- The Scenes table displays contents only when a space or an item inside it is selected.
- New scenes can be created both in Casambi Pro for Windows and Pro for iOS versions, by using the New Scene button in the Scenes pane.

Overview to the Scenes table and property pane in Casambi Pro for Windows:
- Selected space’s name is shown at top left corner of the Scenes pane. If the space is based on a space template, also the template name is shown here.
- New Scene button for creating new scenes. When the button is clicked, a dialog is opened where the scene name can be entered, and the default dimming level can be set.
- Scenes as columns
- Scenes are listed horizontally in columns. There is no limit how many scenes can be added. However, it is essential to keep in mind that in one network,the maximum total number of scenes is 250.
- The header row of each column shows the name of the scene and the default dimming level. If other parameters have been set, the colour temperature is displayed as Kelvin value and other parameters as icons.
- Each cell in the table can be selected by clicking it. Therefore, if the top cell in a scene column is selected, the scene default values are displayed in the properties pane.
- Luminaire groups as rows
- All luminaire groups in selected space are listed in the leftmost column of the table.
- Each row represents one luminaire group.
- Each cell in a row shows how the luminaire group responds when a scene is activated.
- Each cell in the table can be selected by clicking it. Single group’s behaviour in each scene can be edited by first activating a cell in the table, and then editing the parameters in the properties pane.
- Property pane’s top part displays general information for the selected cell in the Scenes table.
- If the topmost cell in a scene column is selected, the properties pane shows the default values for the scene.
- If a cell in a luminaire group row is selected, the properties pane shows the used values for the selected luminaire group in that scene.
- Scene ID is displayed below the scene name
- The Main, Other, Links and Notes tabs display the parameters and values for the item that is selected in the Scenes table.
- When the scene header or an individual group cell is selected on the table, the adjustable parameters are displayed in the properties pane.
Creating a scene
New scenes can be created and edited in both Windows PC and iOS versions of the Casambi Pro by using the New Scene button in the Scenes pane.
|
|

Values in the Scenes table
The Scenes table displays both default and customized settings for scenes. The scenes table works the same way on both Casambi Pro for Windows and Casambi Pro for iOS.

|
 |
Scene properties
Dimming level is the only mandatory parameter for a scene in Casambi Pro. When needed, additional parameters can be activated in the Mains and Other tabs. In the initial Casambi Pro versions, there are three additional parameters: Colour Temperature, Colour and Up/Down light ratio. More parameters will be added in future releases.
Scene defaults
The default values of a scene will be inherited automatically by all luminaire groups in the same space.
|  |
Group specific scene values
If the user wants to customize scene values for a certain group instead of using the default scene settings, they can select a single cell in the Scenes table and set the custom values in the Properties pane.
|
|

Scene table in Casambi Pro for iOS
The scenes are displayed as a table also in the iOS version of Casambi Pro.
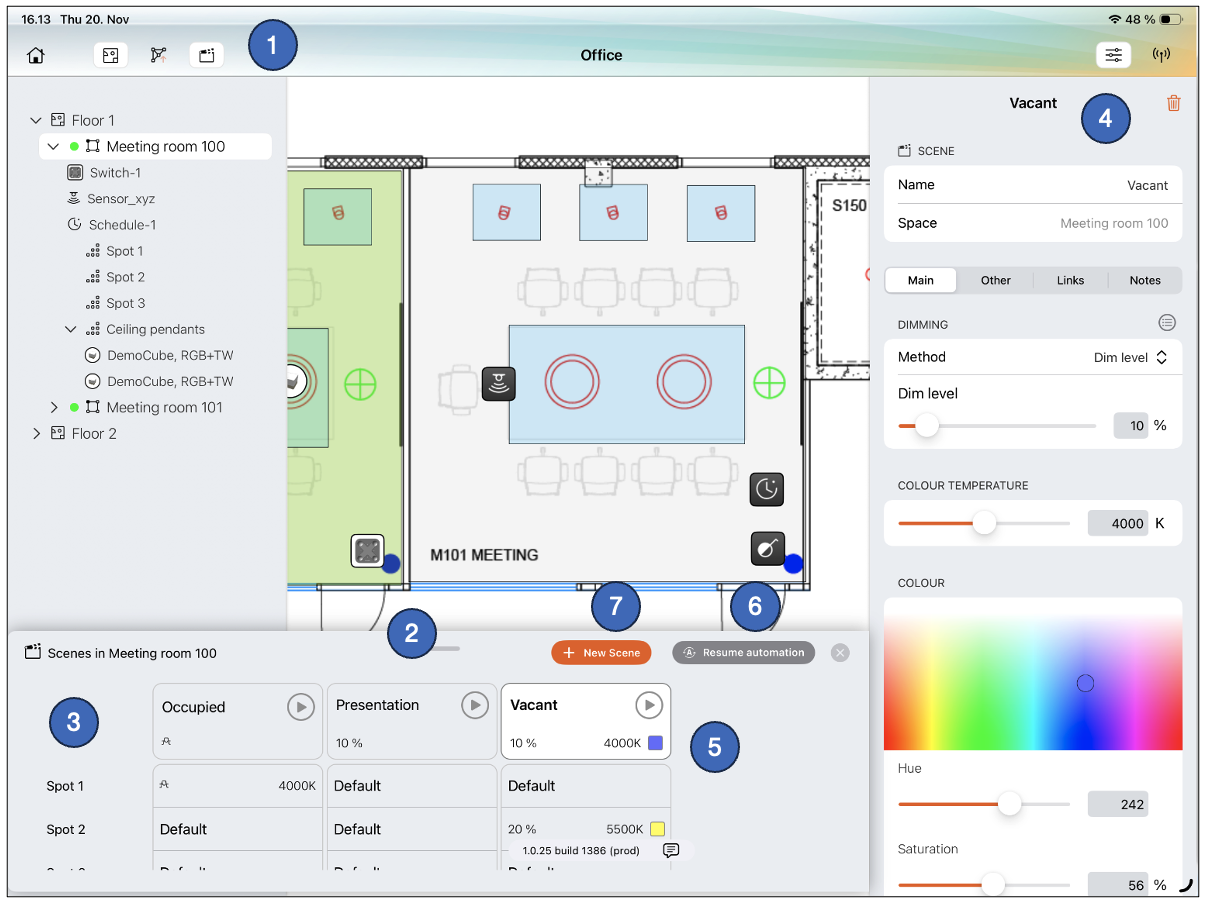
- The Scenes pane is opened/closed from the top toolbar.
- The pane can be resized by dragging the top part of the pane up and down.
- Structure of the scenes pane is same as in Pro for Windows.
- Each cell in the table can be selected to see their details in the properties pane.
- In Pro for iOS, it is possible to run scenes directly from the scenes pane by tapping the Play buttons. The buttons are disabled if there is no connection to the network.
- The Resume automation button can be used to remove the manual control from the network, e.g. when the scenes have been tested with the iPad. This button is available only on Casambi Pro for iOS.
- New scenes can be created with the New Scene button.
Deleting a scene
A scene can be deleted by selecting the scene column header cell in the Scenes table, and then tapping the delete button in scene properties (trash can icon).
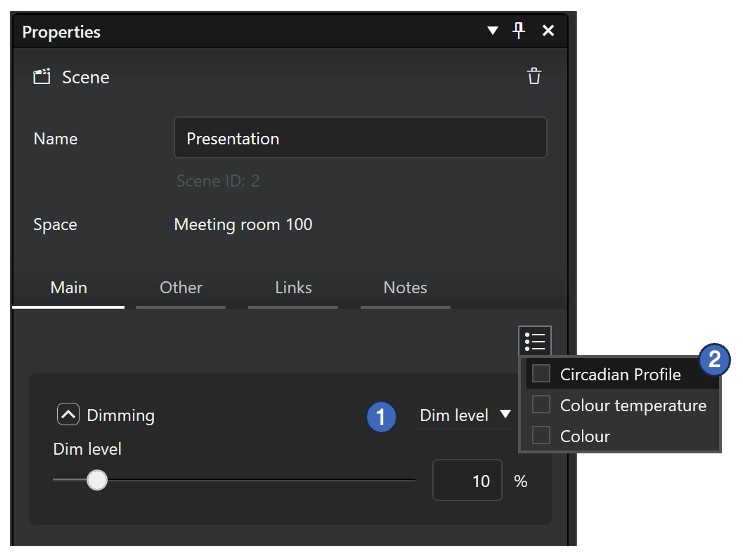
Dimming control in a scene
The dimming control is always part of a scene. There are three methods to control dimming:
- Static dimming level (default)
- Daylight control
- Circadian profile with dimming curve
Selecting method for dimming control:
|  |
Static dimming level
By default, every scene has a set dim level control. The default value for dimming is 100%. If needed, each group can also have their own dimming levels (local values).
Daylight control
Luminaire dimming can be controlled also with a daylight sensor controlled scenes. These scenes utilize information provided by a lux sensor, to automatically adjust the scene lighting level based on the amount of light available.
In Casambi Pro, daylight control uses the Constant Light principle (called “Closed Loop” in the Casambi App). In Constant Light mode, the selected lux sensor continuously adjusts the luminaires in the active scene to maintain the target illuminance level. This is achieved through a feedback loop, where the sensor monitors changes in light output and responds accordingly. The sensor measures combined light from the scene’s luminaires and natural daylight in the space.
Circadian profile controlled dimming
When there are circadian profiles defined in the project, they can be utilized in a circadian scene. When applied to a scene, depending on what curves the profile has, the colour temperature of tuneable white luminaires and their dimming level will both change automatically over time according to the profile graph settings.
See the Circadian Profiles page to learn more how the profiles are created and managed.
Daylight control in Casambi Pro for Windows

|
Notes about daylight control:
- Only one sensor can be selected for controlling the dimming in a scene
- Casambi Pro does not support reading values only from luminaires with integrated or dedicated sensors.
- In Casambi Pro, some parameters familiar from the Casambi App are using static values:
- Change rate: 2,5 seconds
- Tolerance: 15%
- Initially there is no Activation Level graph available in Casambi Pro.
- Limitation with Spaces linked to a space template:
- The target lux level is manually set in the space template editor in Pro for Windows.
- Each templated space uses the same target lux value.
- If you need to adjust the desired illuminance levels individually for each templated space in Casambi Pro for iOS, the spaces must be first unlinked from the parent template.
Daylight control in Casambi Pro for iOS
The daylight control dimming levels can be set on iOS in a separate mode, where the luminaires’ dimming level can first be set in real time to the desired value and then those values are saved to the configuration.

- Current lux level for the selected controlling sensor. The value is displayed if the sensor is within the bluetooth range of the used iOS device.
- The Adjust button opens the Adjustment view where the luminance levels of the luminaires can be set to desired level in real time.
- After the targeted luminance level has been adjusted, the target lux level for the sensor is shown in the properties. This value can also be entered manually.
Note, that with spaces that are linked to a space template, the adjustment mode is not available. Target lux level must be changed in the space template editor in Casambi Pro for Windows.
Daylight scene adjustment view
In the daylight scene adjustment view, the iPad is connected to the network and sensor’s and luminaires’ statuses are displayed in real time. Here each group’s dimming level can be adjusted to the desired luminance level.
Adjustment view when a space is selected

- Sensor’s lux levels are displayed in real time on the layout and in the side pane.
- Luminaire’s dimming level is shown with an indicator bar under the luminaire elements in each group.
- Scene’s default maximum dimming level can be adjusted when the space is selected. By selecting a single group, its dimming levels in the scene can be adjusted individually. Adjusting the dimming level of the group will affect the controlling lux sensor's detected lux value.
- When the desired dimming levels have been adjusted, the settings can be saved by tapping the Save button. When this is done, the scene adjustment view is closed, and the user is returned to the main edit view.
- If a group is not part of the scene (using the "Not used" value), it is not shown in this view.
Adjustment view when a luminaire group is selected

- Selection for the group, to either
- Follow the scene's default dimming value or
- Use the local dimming value or
- Not be part of the scene
- Group's preferred maximum dimming level when using the local dimming value.
Circadian profiles in scenes
A circadian profile can control scene's dimming and/or colour temperature values over time. Circadian profiles are created at the project level and they can be linked to scenes in any network in the project.
See the Circadian Profiles page for details on how to create and manage circadian profiles.
Applying a circadian profile to a scene
Circadian profiles can only be applied to scenes. Therefore, create a scene before assigning a circadian profile to it.
Windows

To apply a circadian profile in a scene:
- Select a scene by clicking scene's header cell in the Scenes table
- Select the Circadian Profile option in the property pane menu. A selection dialog is opened.
- Select a profile from the selection list in the dialog and click Ok.
- Profile is now applied and both the scene table and the scene property pane are updated (see the image below).

When a circadian profile is used to control a scene, the scene property pane displays a profile selection list together with preview of the selected profile. If the profile has only either a dimming or colour temperature curve, the preview is displayed only for those properties. Therefore, it is possible for example to have a scene with static dimming value, but use a circadian profile only for controlling the colour temperature. The circadian profile always controls all groups in the scene. Thus, it is not possible to apply a separate profile to a single group by using local values in the scene properties. |  |
iOS
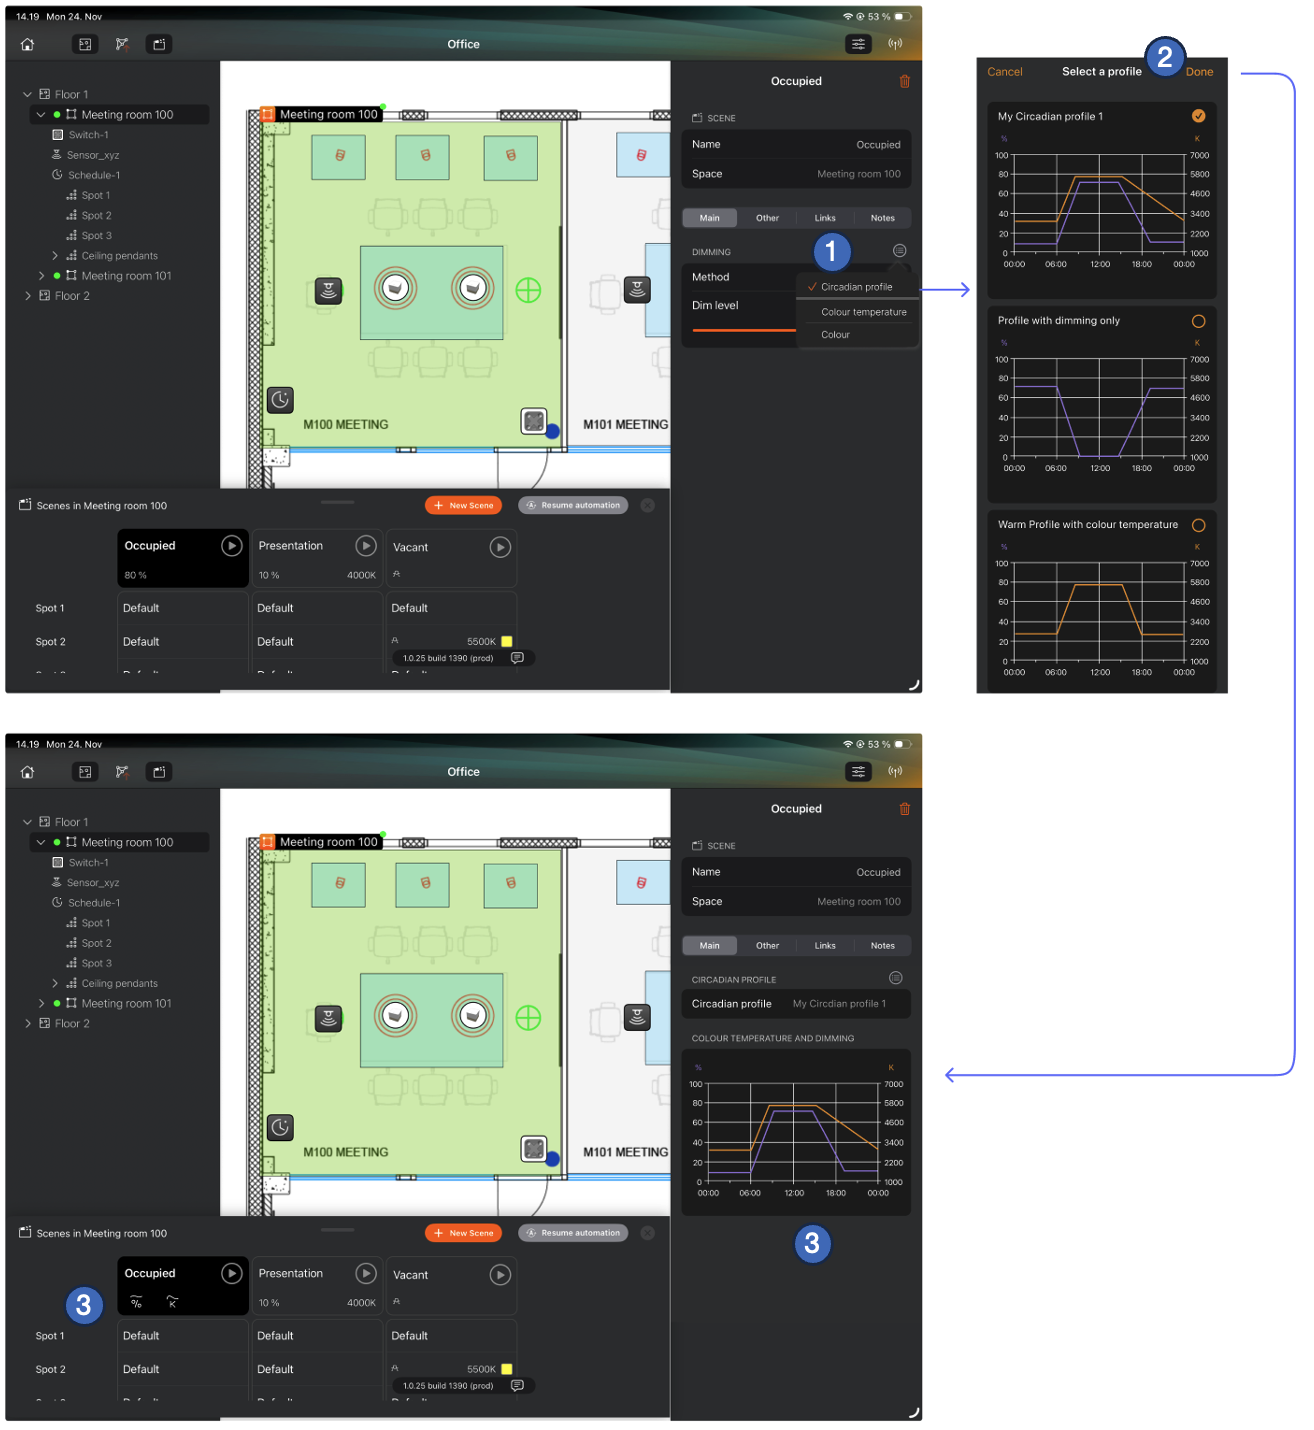
On iOS, applying a circadian profile works similarly to how it does on Windows.
- Activate Circadian profile from the property menu
- Select preferred circadian profile
- When the profile has been applied, the scene table and the scene property pane are updated. If the selected profile has curves for both dimming and colour temperature, both curves are applied.
Removing a circadian profile from a scene
A circadian profile is removed from a scene by unchecking the Circadian profile option from the scene property menu.
Notes about scenes
- Scenes can be deleted only in Casambi Pro for Windows.
- When a space is created by using a space template, the scene values can only be edited in the space template editor in Casambi Pro for Windows.
- Currently (November 2025) it is not possible to create scenes with larger scope than one space.